Learning how to mount deer antlers ought to be part of every deer hunter’s skill set. Although there are many ways to do it, mounting deer antlers is pretty easy, but best of all it’s very rewarding and fun! This article is going to walk you through the overall process of how to mount antlers from a deer so that regardless of which method, style, or kit you use, you’ll be ready to create a great looking antler mount!
First, let’s review the major steps involved in mounting deer antlers. Then, I’ll cover each in more detail.
- Cut off the antlers
- Remove the hide from the skull cap (skull plate)
- Clean the skull cap
- Attach or make a “cover” for the skull plate
- Attach the antlers to a plaque
- Hang & Enjoy!
Materials Needed to Mount Deer Antlers
This list is quite comprehensive. You don't necessarily need all of these materials to mount deer antlers on a plaque, but this is what's needed for a completely custom antler mount.
- Borax (about 1/4 cup) or large pot, water & stove
- Decorative braid
- Fabric or leather (about 12” x 12”)
- Grinder
- Hot glue gun
- Jigsaw or bandsaw
- Knife
- Lighter
- Paper mache
- Pliers
- Plywood, 1/4”-1/2” thick, size approx 5” x 8”
- Reciprocating saw, carpenter, saw, or butcher saw
- Sal soda (optional)
- Saw (reciprocating/zip saw, carpenter saw, or meat/bone saw)
- Screw gun/cordless drill (with drill bits)
- Screwdriver (regular)
- Screws (varies with antler size - approx 1.25” - 2”)
- Staple gun
- Staples (1/4” Arrow or equiv)
- Wood plaque
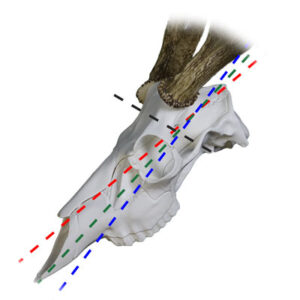
When cutting off deer antlers for an antler plaque mount, pay careful attention to the angle of your through cut because this will affect how your antlers display on the wall. Any of the red, green or blue angles work well, it's up to you!
Removing Deer Antlers How-To
For most antler mounts, the deer’s rack will need to be cut from the skull just behind the eyes and from the back of the skull forward to meet the first cut. See the picture provided for a good picture of what this looks like.
Best Saw to Remove Deer Antlers
My favorite saw to use for cutting off deer antlers is a cordless, 18 volt reciprocating saw (also known as zip saw). This makes quick work of it. Just about any good wood or multi-purpose blade will do the trick. A regular carpenter saw or butcher’s meat saw also works well. I’ve even used my portable hand saw (think
Hooyman) in a pinch. Point is, get the rack off the skull.
Should I Even include the skull plate when I cut off antlers or just cut each antler off flush below the burr?
If you really want to minimize mess and time spent, there are
antler mounting kits available that don’t require the antlers be attached to the skull plate. So, you can cut each antler off flush below the burr if you want to take this approach. These types of kits will include a
replica skull plate. Another cool option is to mount your antlers on an
authentic-looking replica skull, such as Mountain Mike’s Skull Master for deer.
What if I have shed antlers?
Shed antlers obviously don’t come with a skull plate, so you’ll have to either use a
replica skull plate or mount them with a
replica European mount kit. Or, if you’re a budding McGuyver, you can fashion your own way of attaching them to something resembling a skull plate.
Removing the Hide from the Skull Cap
For a clean, long-lasting antler mount, it’s important to remove the hide from the skull cap. To do this, use a knife, pliers, and screwdriver. Basically, there’s nothing fancy to this…just get it off the skull. Make an incision to each antler base, skin the hide back enough to grab, then just yank it off with pliers. A screwdriver can help digging it off around the pedicles too.
How to Remove Deer Hide from Antler Skull Plate When it is Old and Dry
If the deer hide has been on the antler skull plate for a long time, the hide will be dry and hard, making it difficult to remove. Here's the trick...patience. Soak the skull plate in water for a few days. Eventually, it will soften up and you'll be able to remove it. Do this outside, in the garage or a shed...somewhere that the smell won't stink up the house!
Cleaning the Skull Cap of Deer Antlers
After the hide is removed, the next step is to clean the skull plate. Remove as much meat & tissue as you can with a knife. Then, I like to boil the skull plate in water (tip: mix in a tablespoon of sal soda!) for about an hour. Be careful not to submerse too much of the rack in the boiling water as there can be a tendency for the coloring on the antlers to change. If unable to boil, clean as well as you can, and apply powdered borax to the skull cap. Ideally, let the skull plate dry for a few days, but it’s not a big deal if you just keep going.
Once boiled, cool it with water and scrape any remaining tissue. This prevents any chance of future issues with smell or bugs.
Attach or make a “cover” for the skull plate
This is the part where your creativity can really come out! Most hunters like to cover the skull plate with some sort of fabric, leather, or decorative plastic. If you’ve purchased an antler mounting kit, this cover is pre-determined, so just follow the steps. You might not attach it until after you’ve attached the skull plate to the rack. But, I’m going to describe how to make your own!
Making a Custom Deer Antler Cover
First, you need to decide the shape of the cover you’re wanting. I usually use some sort of oval. This will be for a wooden base we need to make. I find that 1/4"-1/2" plywood is ideal for this. Cut out the shape you want with a band saw or jig saw, and we’re going to attach your antlers to this.
Here's a guideline on some shapes you might consider for your antler cover base. This is what gets cut out of plywood.
Download a PDF of this antler cover template for easy application to your own project!

Once you cut out a plywood base for the antlers, I like to cut about a 45-degree "bevel" around the edge. This lets you create a nicer transition of mache to wood when you fill in the voids.
To attach your antlers to this wooden base, drill a couple holes through the skull cap, about 1.5” apart. Then with slightly larger screws, fasten it down to the wood. If the screws are slightly long and protrude through the other side, I grind them flush with a bench grinder. A pair of good nail snips can work too.
Next step is filling the voids of this little base with paper mâché. You might also use plaster or clay, but I prefer paper mâché. Smooth out the mache well as the material you cover this with won’t necessarily hide all imperfections. Take your time, enjoy the process, and think about how awesome this is going to look!
Now it’s time to cover your antlers with your preferred fabric. I like using buckskin or colored felt. A visit to your local fabric store will reveal more options than you can imagine.
To properly fit the fabric or leather to your antlers, it’s important to cut a couple holes where the pedicles are. Measure and mark this carefully, cut out small circles where each pedicle will be. I cut them about half the actual size of the pedicles because the fabric will stretch a bit. Make a cut from the back of each circle out to the edge of the fabric. This lets you get the fabric over the skull plate cover.

With your chosen fabric, measure carefully and make your cuts according to the picture shown. This gets the fabric/leather around each pedicle, with just a subtle seam behind each antler.

Fabric stores have a ton of great choices for covering your deer antler bases. I also highly recommend having your deer hide tanned into buckskin leather so you can use that.
Place the fabric (or leather) over the skull plate cover and secure it to the back of the wood base. I like to use 1/4” staples from a heavy duty staple gun. Hot glue would probably do the trick too but I find staples a faster and better. Carefully work your way around the base, pulling out wrinkles as you go. Think “smooth”.

Decorative braid around the base of each antler can be a nice touch! Check your local fabric store on online taxidermy supply company for what's available.
With the fabric attached, now it’s time to think about putting some decorative braid around the antler bases! This is optional but can make for a nice decorative touch and also hide any gaps between the fabric and antler bases. Be sure to cinge each end of the braid with a lighter, and attach with hot glue or super glue.
Attaching Deer Antlers to a Plaque
All that’s left is putting this on a nice wooden plaque! If you have purchased an
antler mounting kit, you might not attach the skull plate cover until after you attach the skull plate to the plaque. Follow your kit’s specific directions as needed. For this homemade version, I find that attaching the antlers to the plaque works best if you pre-drill the plaque. Find the center and drill a couple holes about 2” apart vertically. Next, lay the antler base on the plaque in your desired position. You might consider putting it in a vise (protect the wood though!) for an extra hand, but once you’ve done this a couple times, it’s pretty easy. Grab a screw-gun with your preferred screw in one hand and cradle the plaque and antlers in your other arm (without moving the antlers). Run a screw in fairly tight. Check that things are in a good spot, and repeat for the 2nd screw, tightening each when satisfied.

Pre-drill your wood plaque to make attachment of the antlers easier.
Hanging a Deer Antler Mount
All that’s left is to attach a small hanger to the top center of your plaque, and your antlers are ready to hang on the wall and be enjoyed for generations to come!
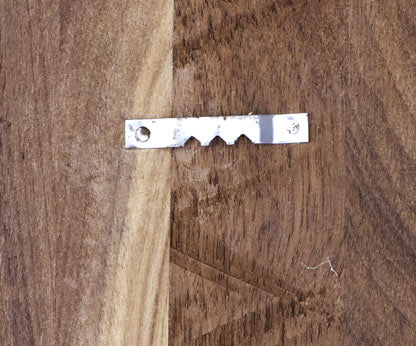
Install a hanger on the back of the plaque for easy wall placement.
Well, that’s an overview of a homemade method of how to mount deer antlers, along with tips for virtually any variation of mounting antlers. There are lots of ways to do this, so use your imagination, and make it your own! If you’re not interested in the completely custom method, give a look at some of our great
antler mounting kits for sale, and good luck!

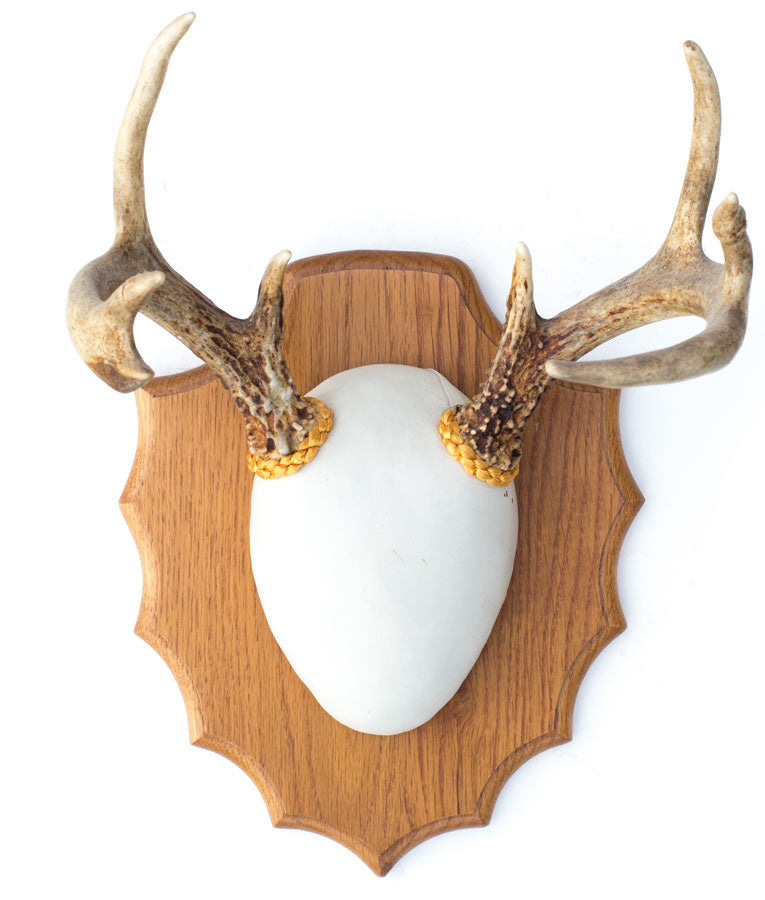
Here's a finished, custom deer antler mount. Come up with your very own, or look for an easy to use
antler mounting kit in our website's store. Thank you!
 Decorative braid around the base of each antler can be a nice touch! Check your local fabric store on online taxidermy supply company for what's available.
With the fabric attached, now it’s time to think about putting some decorative braid around the antler bases! This is optional but can make for a nice decorative touch and also hide any gaps between the fabric and antler bases. Be sure to cinge each end of the braid with a lighter, and attach with hot glue or super glue.
Decorative braid around the base of each antler can be a nice touch! Check your local fabric store on online taxidermy supply company for what's available.
With the fabric attached, now it’s time to think about putting some decorative braid around the antler bases! This is optional but can make for a nice decorative touch and also hide any gaps between the fabric and antler bases. Be sure to cinge each end of the braid with a lighter, and attach with hot glue or super glue.


